Displaying Caller Data
One of the core features of the Heedify CX platform is the ability to dynamically display caller information to agents during customer interactions. This is essential for providing personalized support, improving efficiency, and delivering a seamless customer experience. Depending on the nature of your existing system and its capabilities, there are two primary ways to display caller data in a web page:
- Use your exisiting web based system (CRM) and display it either inside the Agent Console or in a new browser tab.
- Use a Power Automate flow to retreive data from your system and use the Heedify CRM Connector template
The Heedify integration with other systems is configured in the queue level.
Key concepts for configuring Heedify CRM integration
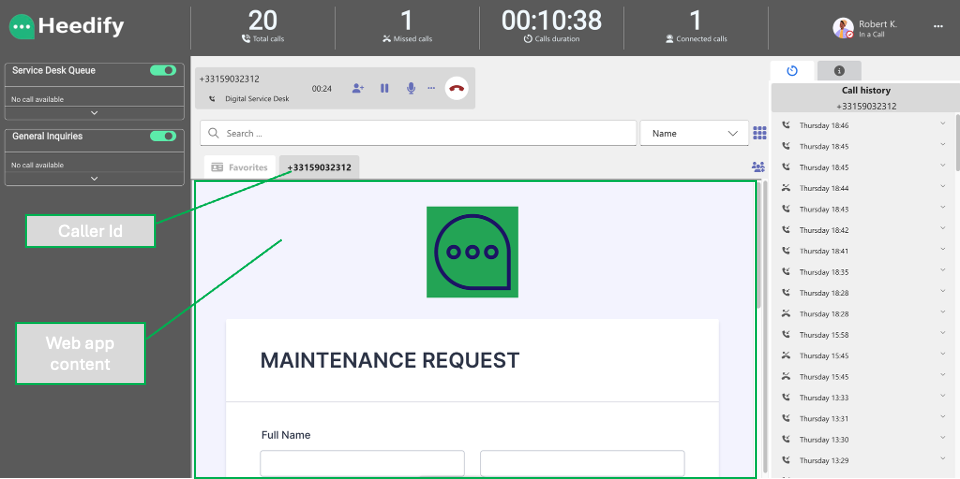
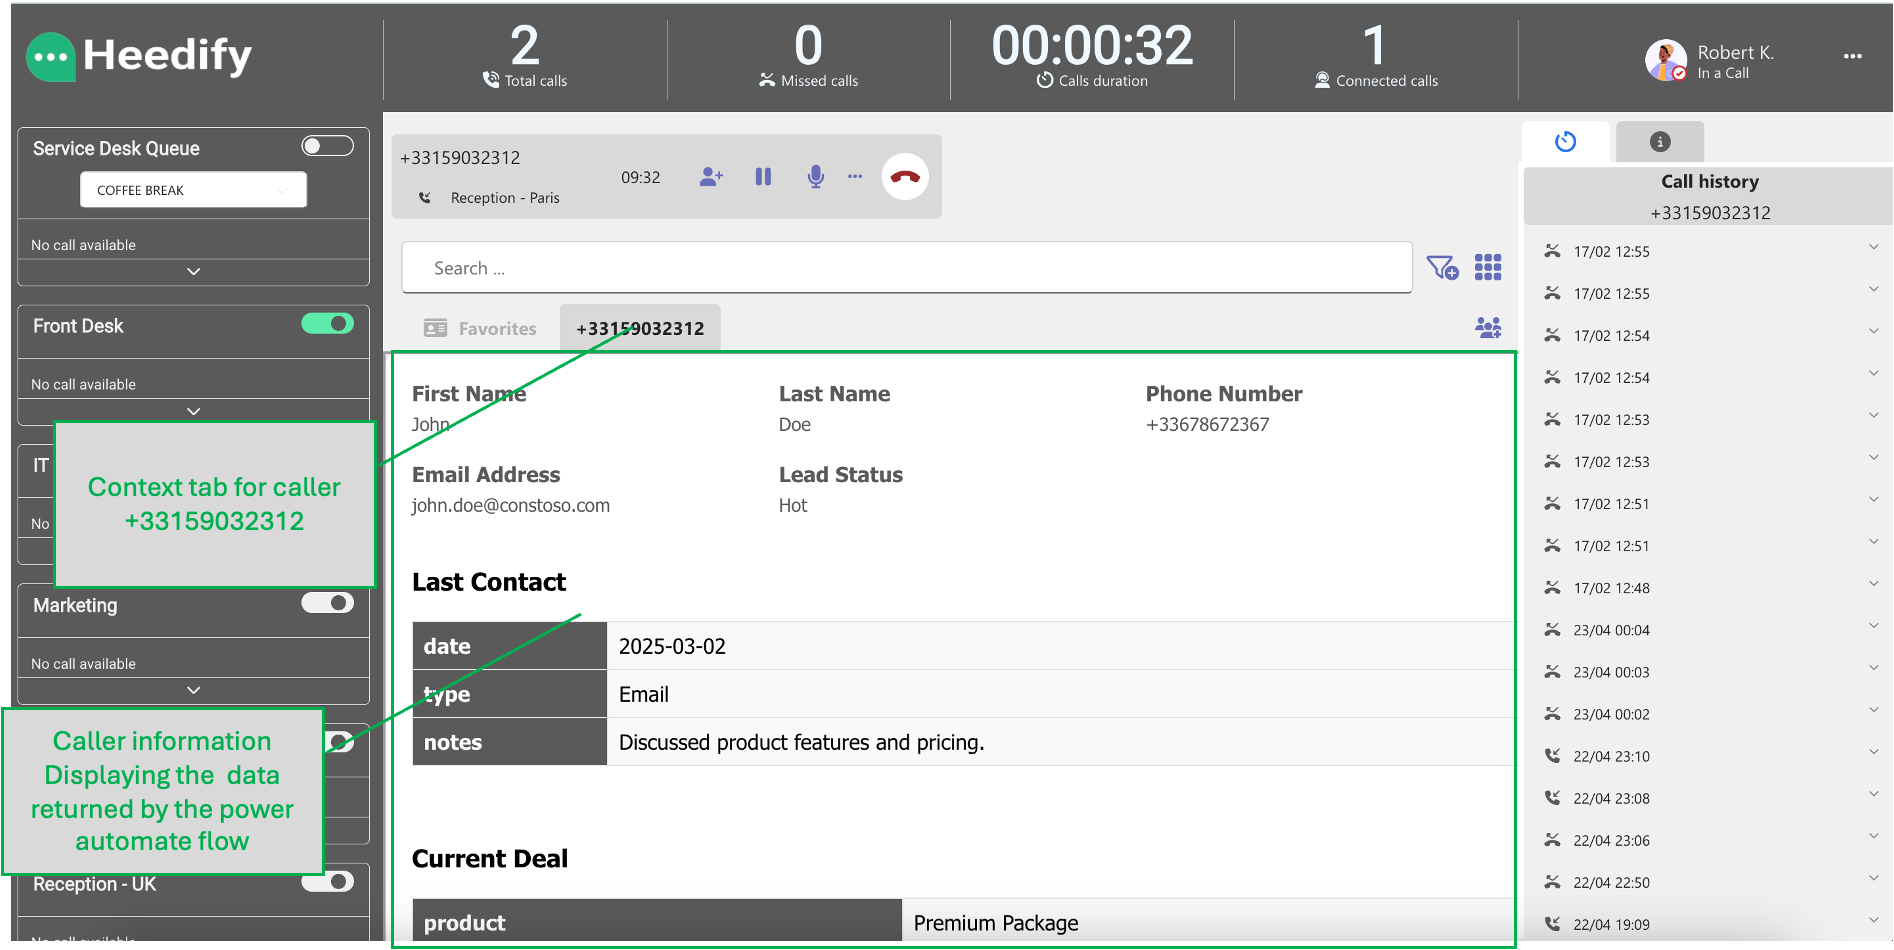
Heedify agent console context tab.
Heedify agent console is designed to display dynamic tabs to bring context to the agent. The default one is the favorite contact tab that displays the favotite conatcts for the agent. this is usful in attendant console context.
The following example highlights a context tab that displays a web app containing a form to be filled out by the agent.
The context tab is opened when a call is received and removed when the agent disconnects automatically.
The context tab can display any web content.
Heedify CRM Connector template
When you use the Heedify CRM Connector template, meaning you have a API/ power automate flow that will be used to retreive data from your Database or CRM then the Heedify template will be used within the agent console to display these information.
The Heedify CRM Connector template is a dynamic web application that displays any JSON based data in the following format.
Configuring service integration in a Queue
To enbale the Heedify CRM Connector, go to the queue configuration
Admin Portal →Queue→Queue Configuration —> service integration.
There are multiple options to integrate with dynamic url web app:
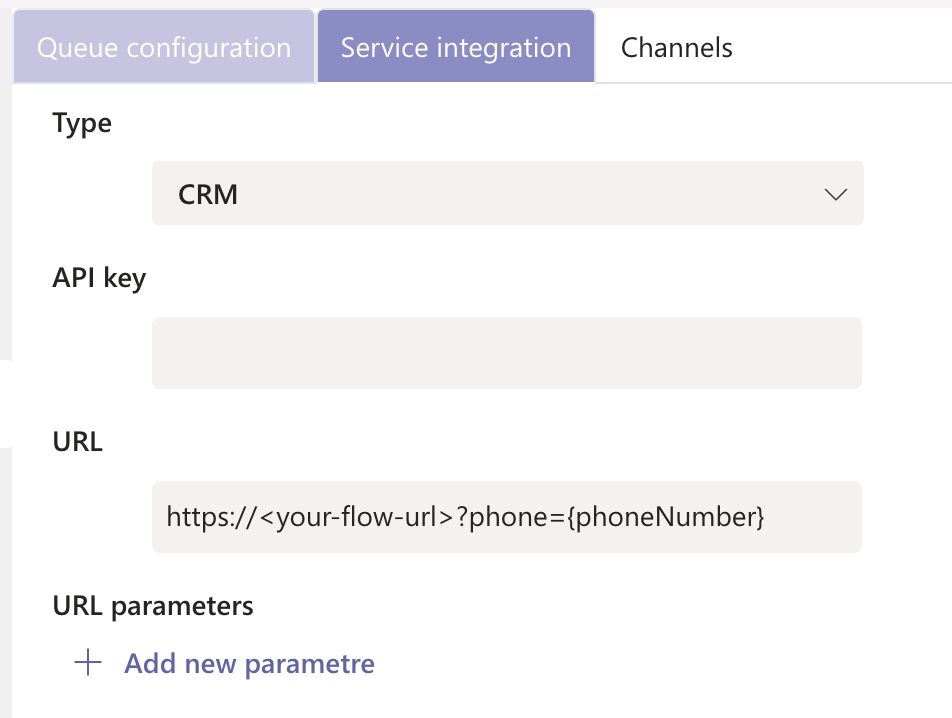
Heedify Admin Queue configuration
| Option | Description |
|---|---|
| None | There is no integration. This is the default option. |
| Webhook | The webhook is an URL that you configure with variables, which gets triggered every time a call is answered by an agent. This allows you to automate tasks such as creating a new support ticket, logging the event, or updating records in external systems. The webhook URL can point to a variety of services, such as a CRM system (e.g., Salesforce, ServiceNow), or it could trigger a Power Automate flow to perform a specific action like updating a database or sending notifications. |
| The URL is designed to accept dynamic parameters, such as the caller ID or other relevant data, which can then be passed to the external system to ensure the correct data is processed. | |
| CRM | With this option you create a Power Automate flow that return data in a predefined format. It will be displayed in the agent console using the Heedify CRM Connector template. |
| Open in agent console | Open the Dynamic URL in the agent console ( in a context Tab). |
| Open in browser tab | This option is usful if your CRM requires an authentication for example.Agent authenticate one time and then the customer data/page will displayed without any authentication required. |
Using variables with Dynamic URLs
If your organization already uses a web-based application (such as a CRM, ticketing system, or customer database) that supports dynamic URLs, the process of displaying caller data becomes straightforward. In this case, each caller has a unique identifier (e.g., callerId), and the system is capable of dynamically generating a URL to display relevant information.
For example, your CRM may use a URL format like:
https://crm.constoso.com/contact/{callerId}
Where {callerId} is dynamically replaced with the actual identifier of the caller when a customer contacts your support team.
You can use the following variables to build the dynamic url to be used for tintegration:
{callerId}: caller ID or phone number{agentId}: it contains the microsoft 365 agent (user) Id{agentDisplayName}: agent Display name{timestamp}: current time
Create a Power Automate HTTP Triggered Flow that Retrieves Salesforce Contact Data
As an example of using Power Automate flow to display caller data in Heedify, you can find below the steps to follow:
Any CRM that have a Power Automate Connector can be integrated to Heedify. The following is just an example to highlight how you can use it. Please check the list of all Power Automate connectors
Salesforce Premium Power Automate Connector needed
- Add a connection in Power Automate: Data > Connections > New Connection > choose Salesforce
- Add URL, select API Version, and test connection
Create a Power Automate Flow
- Go to Power Automate.
- In the left navigation pane, click Create.
- Choose Instant cloud flow.
- Select When an HTTP request is received as the trigger.
- Click Create.
Query Salesforce for Contact Data
- Add Salesforce Query Action:
- Use the Salesforce - Query action to retrieve contact records from Salesforce.
 SELECT Id, Name, Phone, Account.Name, LastModifiedDate, Notes__c
 FROM Contact
 WHERE Phone = '{triggerOutputs()?['body/phone']}'
This query retrieves:
- Id: The contact’s unique identifier.
- Name: The contact’s name.
- Phone: The contact’s phone number.
- Account.Name: The associated account’s name (the customer name).
- LastModifiedDate: The last modified date for the contact (you can use this to track when it was last contacted).
- Notes__c: A custom field for storing notes (if you have this in Salesforce; if not, you could adapt it based on the fields you have).
Sample JSON Response Format
When you query Salesforce, the response may look something like this:
{
   "records": [
     {
       "Id": "0031x00000Dkmy2AAB",
       "Name": "John Doe",
       "Phone": "555-555-5555",
       "Account": {
           "Name": "Acme Corp"
       },
       "LastModifiedDate": "2025-03-16T15:00:00Z",
       "Notes__c": "Follow up next week"
     }
   ]
}
Generate a Custom JSON Schema from Sample Response
- After the Salesforce - Query action, add a Parse JSON action to handle the response.
- In the Content field, select the Body from the Salesforce action (this is the raw response).
- Click Generate from sample.
- Paste the simplified Salesforce response (shown above) into the sample field.
Power Automate will automatically generate the JSON schema based on the response structure.
Customize the Output Format
Now, to transform the Salesforce response into your desired format, follow these steps:
- Add a Compose Action after the Parse JSON action.
- In the Inputs field of the Compose action, you’ll write an expression that re-structures the parsed data into the format you want.
Here’s an example of how you can structure the Compose action to match your desired format:
{
   "name": "@{body('Parse_JSON')?['records'][0]['Name']}",
   "phoneNumber": "@{body('Parse_JSON')?['records'][0]['Phone']}",
   "Id": "@{body('Parse_JSON')?['records'][0]['Id']}",
   "account (customerName)": "@{body('Parse_JSON')?['records'][0]['Account']['Name']}",
   "lastContacted": {
       "timestamp": "@{body('Parse_JSON')?['records'][0]['LastModifiedDate']}",
       "contact": {
           "type": "call/email"
       }
   },
   "notes": {
       "date": "@{body('Parse_JSON')?['records'][0]['LastModifiedDate']}",
       "noteText": "@{body('Parse_JSON')?['records'][0]['Notes__c']}"
   }
}
Return the Customized Data in an HTTP Response
Once the data is structured as needed, you can send it back to the caller (the client that triggered the flow) using a Response action.
- Add a Response Action:
- After the Compose action, add a Response action.
- Set the Status Code to
200(success). - In the Body, use the output from the Compose action, which now contains your custom JSON format.
Here’s how you can map the data:
{
   "name": "@{outputs('Compose')?['name']}",
   "phoneNumber": "@{outputs('Compose')?['phoneNumber']}",
   "Id": "@{outputs('Compose')?['Id']}",
   "account (customerName)": "@{outputs('Compose')?['account (customerName)']}",
   "lastContacted": {
       "timestamp": "@{outputs('Compose')?['lastContacted']['timestamp']}",
       "contact": {
           "type": "@{outputs('Compose')?['lastContacted']['contact']['type']}"
       }
   },
   "notes": {
       "date": "@{outputs('Compose')?['notes']['date']}",
       "noteText": "@{outputs('Compose')?['notes']['noteText']}"
   }
}
Test the Flow
- Save the flow.
- Click Test in the top-right corner.
- Choose Manually and click Test.
- Power Automate will provide an HTTP endpoint URL. Use this URL to send an HTTP request with the phone number as a query parameter.
For example:
https://<your-flow-url>?phone=555-555-5555
Use the flow Url in Heedify
When you configure the CRM integration in the Queue use the following url :
https://<your-flow-url>?phone={phoneNumber}